Viewing entries in
"Eggs"

Comment

rhubarb curd

It's a rhubarb party and everybody's invited!  We got our first fruit share from Grant Farms CSA this season and it's, you guessed it, a whole buncha rhubarb (not fruit, I know, but the closest thing we can get this time of year!).  As soon as I brought my armful of pink and green stalks home, I started perusing the interwebs for recipes.  Not rhubarb and strawberry recipes, but rhubarb recipes.  Now, I'm definitely not hating on the combo, but I just really wanted to find something that allowed the flavor of rhubarb to shine, not just to be a tangy counterpart to a sweet strawberry.

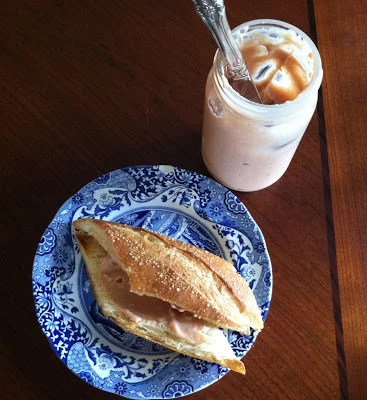
Enter, rhubarb curd.  The recipe is from Food52 and after making it once I'm already in love with it!  This sweet and sour concoction is both delicious and beautiful with it's pale pink hue and silky, spreadable texture.  I paired mine with this Plum & Strawberry Sour Cream Cake for a supremely summery dessert.  The next morning I spread some of the curd on a toasted baguette for breakfast.  I'm pretty sure it would be ridiculous on a good buttermilk scone.  The possibilities are many!

In order to get the pudding-like texture of curd, the recipe calls for pushing your cooked mixture through a fine mesh sieve.  This process admittedly takes a lot of work.  Like, a lot.  But will yield a more elegant final result with a smooth consistency.  Give it a try!

Rhubarb Curd

fills a 16 oz jar to the brim

3/4 pounds rhubarb (6-8 stalks)

1/2 cup water

1/4 cup plus a scant 1/2 cup sugar

4 egg yolks

1 teaspoon lemon zest

1 T lemon juice

6 T butter, diced

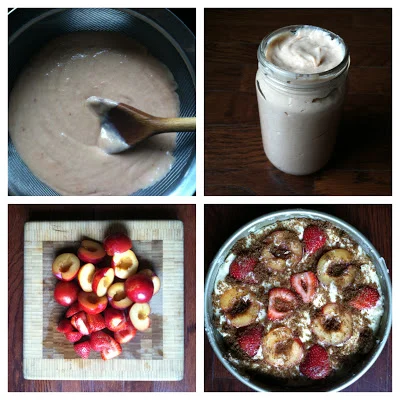
Wash rhubarb well and trim the ends.  Cut into 1-inch chunks.  In a small saucepan, heat rhubarb, 1/4 cup sugar and water on medium.  Cook, stirring often, until rhubarb falls apart and all the pieces have dissolved, lowering heat to low when the mixture becomes thicker.  Use an immersion blender to puree the mixture well until it's pulpy but smooth.  Remove from heat and set aside.

Add a couple inches of water to the pot of a double boiler and set over medium heat.  Add the egg yolks, butter, remaining sugar, lemon zest and lemon juice and cook over the double boiler, whisking constantly until butter is melted and sugar has dissolved, about 3 minutes.  Add the rhubarb puree by the spoonful, whisking constantly, and cook mixture until it thickens and is warm to the touch, about 5 minutes more.  Remove from heat.  Using a flat-ended wooden spoon, push the curd through a fine-mesh strainer to refine the texture.  Pour curd into a 16 oz jar and refrigerate until ready to use.

Comment

Comment

Bacon and Egg Breakfast Sandwich

I love breakfast.  Have I mentioned that before?  Not only is it increasingly evident that it truly is a "most important" meal, but it highlights two of my favorite foods - eggs and bacon!  Funny thing... this sandwich has both.

The composition is really simple, so the key is choosing the very best ingredients.  My sandwich started out with Marczyk's ciabatta, which is hand-made using local, organic flour and is incredibly delicious.  I also used Niman Ranch bacon, farm-fresh Penny's Eggs from Nunn, Colorado, and a peppery, flavorful, savory mix of microgreens.  What in the heck are these microgreens I am speaking of, you ask?  For those that don't know - they're the baby-est of the baby lettuces.  They start as the seeds of various herbs and vegetables (such as cilantro or beet) and are harvested when the leaf is about two inches tall.  They are often intense in flavor and are also highly nutritious, not to mention cute-as-a-button and a fun way to make just about any dish prettier.  If microgreens are difficult to find, arugula is a good substitute and is pretty widely available.


Bacon and Egg Breakfast Sandwich
makes one

1 small (8" or so) loaf Ciabatta, or other good-quality fresh bread
1/4 of a ripe avocado
3 strips bacon, fried crisp and fat reserved
1 egg
1/4 cup microgreens (or baby lettuce greens)
salt and pepper, to taste

Slice bread in half, lengthwise.  Mash the avocado with a fork and spread on one side of the bread.

In a small pan, add about 2 tsp of the reserved bacon fat and heat over medium-high.  When fat is hot, add egg and fry until the white's edges are crispy and golden, about 5 minutes.  Layer bacon, fried egg, and microgreens on your bread and sprinkle with salt and pepper.  Slice in half and enjoy.

Comment

1 Comment

Beet, Carrot & Potato Cakes

I am a beet lover.  It's a good thing, too, because we got more beets than I knew what to do with in the last several weeks of our Grant Family Farms CSA share.  Thankfully, they are one of those hearty vegetables that seems to last forever when stored properly, so I'm still working through my rather sizable supply of them.

My dear husband, unfortunately, does not like beets (one of the very few things he just never had a taste for).  That means I'm always trying to come up with clever ways to hide them, although their vibrant pink color inevitably gives them away!  But their flavor doesn't have to be quite so earthy and strong, if you know how to treat them properly.  My favorite way to sneak beets into a meal is by mixing them with some other vegetables and frying the heck out of them.  Even the pickiest eaters won't scoff at a crispy, salty, fried vegetable cake.  Serve them up with some nice, thick sour cream and sliced green onions and you've got a beautiful, nutritious and super tasty side dish.  Boom!

Beet, Carrot & Potato Cakes
makes about 12

1 large beet, scrubbed & grated
2 small yukon gold potatoes, scrubbed & grated
2 small carrots, peeled & grated
1 small white onion, grated
2 eggs, lightly beaten
3/4 cup matzoh meal
vegetable oil
salt, to taste

In a large bowl, mix together the grated vegetables, eggs and matzoh meal.  Add about 1/4 cup of vegetable oil to a large frying pan and heat over medium-high.  Form the mixture into small patties and add to the hot oil, gently pressing the cakes flat with a spatula.  Fry until crispy and browned, about 4-5 minutes per side, adding extra oil as necessary.  Allow to drain on a paper-towel lined baking sheet and salt immediately after removing from the pan.  Serve immediately with sour cream and sliced green onions, if desired.

1 Comment

1 Comment

Perfectly Hard-Cooked Fresh Eggs

Anybody who has ever tried to hard-cook a very fresh egg knows that there's always one problem you come up against - they're impossible to peel!  The albumen (that thin "skin" between the shell and the egg white) wants to stick.  This means that when you go to peel the egg, the shell clings to that albumen for dear life which will make it nearly impossible to remove the shell without removing chunks of egg with it, resulting in a hard-cooked egg that looks like somebody used it for target practice.

Most people will tell you to just use older eggs (about 7 to 10 days) and that's a perfectly good solution to the problem.  But what if you don't want to wait more than a week to cook your eggs?  The solution is simple:  you quick-age your eggs!  All you need to do is store your eggs at room temperature for 24-48 hours.  Boom!  You've got aged eggs. 

If the thought of storing your eggs at room-temperature freaks you out, here's some food for thought...  Most commercially-produced eggs are washed before they get packaged.  Eggs have a natural coating when they come straight from the hen that protects the insides from bacteria, but when the eggs are washed this coating is removed and the eggs are more vulnerable.  Farm-fresh eggs still have this natural armor and can stand up to the elements better than a store-bought egg.  What's more is that if you ever feel unsure, you can immediately tell if your egg has gone bad by the way it behaves when you submerge it in water:  If it sinks, it's fresh, if it stands straight, it's less fresh but still good, and if it floats, throw it out. 


Perfectly Hard-Cooked Fresh Eggs
makes 12

1 dozen farm-fresh eggs, kept at room temperature for at least 1 day
water

Place your eggs in a large pot (large enough so that the eggs aren't over-crowded).  Cover the eggs with water and bring to a boil.  Immediately remove from heat and cover.  Allow eggs to cook for 14-15 minutes.

Meanwhile, fill a clean sink or a large bowl with water and add about 5 cups of ice.  When the eggs are finished cooking, immediately place them in the ice water.  Allow eggs to sit in the ice-water for at least 5 minutes before peeling. 

1 Comment

Comment

Zucchini and Corn Pancakes with Brown Butter Yellow Tomato Sauce

When I was a kid, one of my favorite things to have for dinner was breakfast.  Every now and then my dad would make a huge mess of waffles or pancakes with jam-sweetened sour cream (it's a Scandinavian thing) and usually some bacon or sausage.  The prospect of a sweet, doughy treat in the evening was somehow even more exciting than when he made them for breakfast!

As an adult I still enjoy breakfast for dinner, or "brinner" as we like to call it.  This dish is a bit of a departure from your average breakfast but a simple meal of hot pancakes topped with sauce is still decidedly brinner-esque.  These gluten-free pancakes are crisp on the outside thanks to the brown rice flour and soft, toothsome and packed with vegetables on the inside.  You can make these with any ol' flour you have on hand, but I highly recommend giving the rice flour a try.  It's nutritious and it tastes great!

The tomato sauce in this recipe is a great way to use up all those late-summer tomatoes you may have on hand that are starting to get soft.  I used smallish yellow ones to yield a beautiful golden, buttery sauce but any kind of tomato will work well.  Just use a sharp knife to make an "X" on the bottom of the tomato, toss it in boiling water for a minute or two, then plunge into ice water immediately.  Once the tomato is cool it's a cinch to peel and you'll be moments away from this luxurious sauce.


Zucchini and Corn Pancakes with Brown Butter Yellow Tomato Sauce
makes about 8 large pancakes

Pancakes:
1 medium zucchini, grated
1 medium yellow squash, grated
3 ears of fresh corn
2 large eggs
3/4 cup rice flour
1/2 cup milk
salt and pepper
1/3 cup olive oil
1/4 cup chopped parsley

Tomato Sauce:
3 T salted butter
1/2 a yellow onion, diced
5 medium yellow tomatoes, shocked and peeled
salt and pepper, to taste

First, prep your vegetables.  Toss the grated zucchini and squash with about a teaspoon of salt and allow to drain in a colander for at least 20 minutes, periodically giving the squash a gentle squeeze to release the excess liquid.  Cut the corn kernels from the cob and toss with the squash.  In a medium bowl, whisk the eggs, flour and milk until smooth.  Heat a large, flat-bottomed pan over medium-high and add about 3 T of the olive oil (enough to coat the bottom thoroughly).  Add veggies to the pancake batter just before you are ready to fry the pancakes, season with salt and pepper, and mix well to combine.  Spoon the batter directly into the pan and fry each pancake until golden brown, about 4 minutes per side.  Add more olive oil to the pan as necessary and keep the pancakes warm in a 250-degree oven.

Meanwhile, melt the butter in a medium saucepan over medium-high.  As soon as butter has melted, reduce heat to between medium and medium-high and cook until the butter is browned, stirring often, about 8 minutes.  Add onion and cook until softened, about 5 minutes.  Add the tomatoes to the pot and crush with a wooden spoon until a chunky sauce results.  Cook another 5 minutes (longer, if you like) and season with salt and pepper.  Serve pancakes with tomato sauce on top and garnish with chopped parsley.


Comment