Viewing entries in
"Community Supported Counter Culture"

Comment

How to Roast Any Squash


 It's squash season!  Let us rejoice!  There are so many things I love about squash, not the least of which is how sturdy they are!  We've been getting squash from our CSA for weeks and I'm building up quite a nice collection.  When stored in the proper environment, winter squash can keep for months.  Want it to last longer than that?  It freezes beautifully.

Some people like to peel the squash, dice up the flesh, and freeze it raw.  This is a perfectly decent method except for one thing - the prep work sucks!  Peeling squash with a vegetable peeler is darned-near impossible, and peeling it with a knife is difficult and time-consuming.  That's why my preferred method is roasting, scraping the flesh from the skin, and freezing it.  Having pre-cooked squash on hand is fodder for practically instant meals, makes squash soup or sauce a cinch, and even makes a great add-in for dog food!  Plus, it doesn't require any fancy knife work, which makes it faster and less dangerous for those home cooks who have less-than-great knife skills!

Whatever you decide to do with it, use these simple instructions as the base for all your various squash creations.  And with all that extra time you saved, you can throw yourself an impromptu dance party!


How to Roast Any Squash

Several lbs. mixed squash (Acorn, Butternut, Buttercup, Spaghetti, Kabocha, Pumpkin, etc.)
water
large roasting pan with inner-fitting roasting rack

Heat oven to 425 degrees.

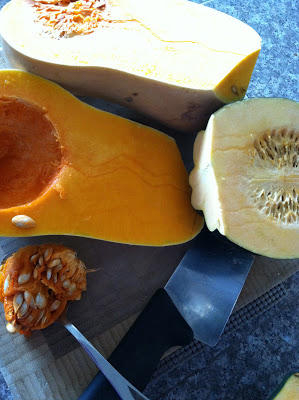
Wash squash well, removing any clumps of dirt from the skin.  Using a good, sharp knife, slice a small layer from the base of the squash to give yourself a flat bottom.  Hold the squash firmly and slice in half.  Use a large spoon to scoop out the seeds and pulp.

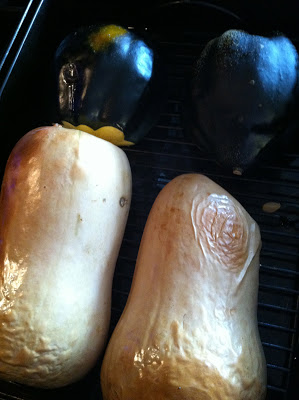
Add about 2 inches of water to your roasting pan (so it comes to just below the roasting rack).  Place your squash halves cut-side down on the rack and place in the oven.  Roast for about 1 hour, or until the thickest part of the squash is cooked through (it should yield easily when pierced with a knife).

Scoop the flesh from the skin and place in a container or plastic bag.  Allow to cool in the refrigerator completely before sealing the container, then freeze, if desired.

Comment

Comment

Honey Jalapeño Dill Dressing with Apple & Kohlrabi Slaw


You hear a lot of talk about sustainability in food, these days.  It means a lot of different things to a lot of different people, but not everybody realizes how simple it can be to take steps towards eating sustainably in your own home.

One of the things I like to focus on, because it's something absolutely everybody can add to their cooking routine, is managing waste.  What are we throwing away that we could actually be saving and using?

My friends at The Real Dill, the best pickle makers in the known universe operating right here in the city of Denver, take this concept to new, flavor-packed heights by suggesting that we use what many people probably throw away as an ingredient.  What a concept!  I don't know about everybody else, but I have dumped many a precious jarful of pickle brine down the sink without a second thought.  But why in heavens shouldn't we use the stuff?!  It's absolutely full of delicious flavor!

For this recipe, I used not only the brine but the pickled garlic cloves and jalapeño that can be found in every jar of their Jalapeño Honey Dills.  The result is a refreshingly light, sweet and tangy dressing with the essence of spicy-sweet pickles.  The season is still bountiful with apples and kohlrabi, so I tossed them in the dressing with the diced, pickled jalapeno and a healthy handful of cilantro leaves.  Serve right away for a crispy, crunchy and subtle-tasting slaw or let it marinate for a day or two (leave the cilantro leaves out and add just before serving) for a sweet, tangy and pickled-tasting version.  Still have a couple of pickles left?  Dice them up and invite them to the slaw party!  The more the merrier...


Honey Jalapeño Dill Dressing with Apple & Kohlrabi Slaw
serves 4-6

Dressing:
1/4 cup Pickle Brine
2 pickled garlic cloves
2 tsp mustard
2 tsp honey
2 T olive oil
salt and pepper, to taste

Slaw:
1 small Kohlrabi, peeled
2 apples
1-2 pickled jalapeños, seeded and diced
1 cup cilantro leaves

First, assemble the dressing.  In a blender, combine brine, garlic, mustard and honey and blend until garlic is well-chopped.  With the blender on, slowly drizzle in the olive oil.  Set aside.

Using a mandoline with the julienne attachment, cut the unpeeled apples and kohlrabi into 1/4" strips.  Toss together with dressing and diced jalapeño.  If desired, allow to marinate for 1 to 2 days for a more intense-flavored slaw.  Toss with cilantro leaves just before serving.

Comment

1 Comment

Beet, Carrot & Potato Cakes

I am a beet lover.  It's a good thing, too, because we got more beets than I knew what to do with in the last several weeks of our Grant Family Farms CSA share.  Thankfully, they are one of those hearty vegetables that seems to last forever when stored properly, so I'm still working through my rather sizable supply of them.

My dear husband, unfortunately, does not like beets (one of the very few things he just never had a taste for).  That means I'm always trying to come up with clever ways to hide them, although their vibrant pink color inevitably gives them away!  But their flavor doesn't have to be quite so earthy and strong, if you know how to treat them properly.  My favorite way to sneak beets into a meal is by mixing them with some other vegetables and frying the heck out of them.  Even the pickiest eaters won't scoff at a crispy, salty, fried vegetable cake.  Serve them up with some nice, thick sour cream and sliced green onions and you've got a beautiful, nutritious and super tasty side dish.  Boom!

Beet, Carrot & Potato Cakes
makes about 12

1 large beet, scrubbed & grated
2 small yukon gold potatoes, scrubbed & grated
2 small carrots, peeled & grated
1 small white onion, grated
2 eggs, lightly beaten
3/4 cup matzoh meal
vegetable oil
salt, to taste

In a large bowl, mix together the grated vegetables, eggs and matzoh meal.  Add about 1/4 cup of vegetable oil to a large frying pan and heat over medium-high.  Form the mixture into small patties and add to the hot oil, gently pressing the cakes flat with a spatula.  Fry until crispy and browned, about 4-5 minutes per side, adding extra oil as necessary.  Allow to drain on a paper-towel lined baking sheet and salt immediately after removing from the pan.  Serve immediately with sour cream and sliced green onions, if desired.

1 Comment

1 Comment

Aged Cheddar Scones

A good scone can be hard to come by, these days.  I am rarely satisfied by the over-sweet, cakey varieties that are available in supermarkets and don't even get me started on the frosted abominations they sell at most coffee shops.  To me, a good scone should be light, crumbly, and not the least bit cakey in texture.  It should be moist enough to have a tender bite but dry enough to crumble.  No frosting allowed!

These scones are of the savory variety and make a wonderful accompaniment to soups and stews.  I also tried mine with a little Sicilian Lemon Marmalade (available at Marczyk's and WELL worth the high price tag!) for a hint of tangy sweetness and it was just delicious.  The cheese I used was Nakhu Cheddar from Windsor Dairy, where they produce old world cheeses from raw, grass fed milk.  Any dry, sharp aged cheddar will do here but if you live in Colorado, give the Windsor Dairy cheese a try!

I assembled these scones like drop biscuits, gently forming the dough into balls and pressing it into little disks.  This enables you to form scones without handling the dough very much, which results in a wonderful, crumbly texture.  Make sure to monitor your moisture levels with this dough - I used a very thick sour cream, so if using a runnier cream you may not need the extra water.  As long as there's just enough liquid to help the dough barely hold together, the end result will turn out just right!


Cheese Scones
makes about a dozen

1 1/2 cups grated sharp aged cheddar
2 cups flour
1 T baking powder
6 T butter, diced and chilled well
6 T sour cream
3 T water
1 tsp salt
3 eggs

Heat your oven to 375 degrees.  In a large bowl, whisk flour and baking powder together.  Add butter and cut with a pastry blender (or blend with your fingers, working quickly) until the mixture resembles coarse crumbs.  Add cheese, sour cream and 2 of the eggs, lightly beaten, and mix until just combined.  If dough doesn't come together, add extra water one tablespoon at a time.

Make an egg wash by whisking the remaining egg with 2 tablespoons of water or milk.  Turn the dough out onto a lightly floured surface.  Divide in half and set one half aside.  Press the dough into a disk about 2 inches thick and repeat with the remaining dough.  Place the disks on a large baking sheet.  Score each disk into six wedges and brush with egg wash. Bake until just golden, about 20 minutes.  Serve immediately and store at room temperature for up to three days.

For drop-biscuit style scones, simply form dough into 12 small balls and gently pat down to form a disk.  Brush with egg wash and bake according to above instructions.


1 Comment

Comment

Rustic Roasted Tomato Soup

Tomato season isn't over yet, folks!  It may officially be the start of the Fall season, but locally-grown heirloom tomatoes are still filling the produce shelves (and, thankfully, arriving by the bagful in our CSA share!).  We won't have these bright, meaty, wonderful fruits much longer, so now is the time to get your fill while they are still here!
To make the soup, I generously coated the tomatoes with olive oil and roasted them until the skins started to split and the flesh softened.  This not only makes them quick and easy to peel but it also adds an extra depth of flavor to the dish.  I also used plenty of little Colorado-grown butterball potatoes, unpeeled.  I like the extra flavor and texture that the potato skin gives to the soup, but if you want a less "rustic" version you can use peeled potatoes.  I served this alongside an onion bagel with a mixture of shredded, fresh mozzarella and Fruition Farms sheep's milk ricotta (one of my absolute favorite locally-made cheeses and a must-try ingredient available at Marczyk Fine Foods).  The whole thing was melted and toasted under the broiler and then topped with a little extra parsley.  Now that's a "grilled cheese and tomato soup" meal that I can get behind!


Rustic Roasted Tomato Soup
serves 6

2 1/2 lbs heirloom tomatoes
8 cloves garlic, unpeeled
2 T olive oil, plus more for roasting
1 yellow onion, diced
1 1/2 lbs small potatoes (fingerling, butterball, etc.)
2 jalapenos, minced
2 T tomato paste
2 cups vegetable stock
1/4 cup fresh parsley, chopped
salt and pepper, to taste

Heat oven to 425.  Generously coat tomatoes and garlic cloves with olive oil and arrange on a baking sheet.  Roast until tomatoes soften and skins lightly brown, about 20 minutes.  Remove from oven and allow to cool until they are ready to handle.  Gently peel the skin from each tomato and squeeze the garlic cloves from their skins.  Set aside.

Meanwhile, heat a large pot over medium-high and add olive oil.  Add onions and saute until they soften, about 5 minutes.  Add potatoes and jalapenos and cook another minute.  Add tomato paste, stock, peeled tomatoes and garlic cloves and bring soup to a boil.  Reduce to a simmer and cook until potatoes are very tender, about 30 minutes.  Use a potato masher (or a food processor, if desired) to break apart the potatoes and tomatoes until a thick, chunky mixture results.  Generously season with salt and pepper and serve hot, topping each serving with a little of the fresh parsley.

Comment