Comment

rainbow shrimp and grits

Is there anything quite so wonderful as the combination of shrimp and grits?  Perhaps it is the blend of sweetnesses from the shrimp and corn , or the briny taste of seafood paired so nicely with the earthy aroma of good-quality, coarse grits that makes the dish so wonderful...  the point is:  it's one of those perfect culinary combinations that begs to be explored.

I am usually disappointed in the versions I find in restaurants, often times because of the quality of corn meal I encounter.  Even the cheap, instant stuff has a satisfying "comfort food" quality to it (and don't get me wrong, I'll still eat it!  Kinda like pizza... good, even when it's bad.), but it totally lacks in complexity and depth of flavor, which the cook will often counteract by adding copious amounts of butter and cream.  If instant grits are your thing, I'm not hating on that.  I get it - they're easy.  But before you eschew forking over a little extra money for the good stuff, consider the benefits:

Traditionally milled grits still have the germ (otherwise known as:  whole grain!) so they are rich in fiber and nutrients; heirloom grains are independent from the commercial food system;  and perhaps most importantly, they taste infinitely better.

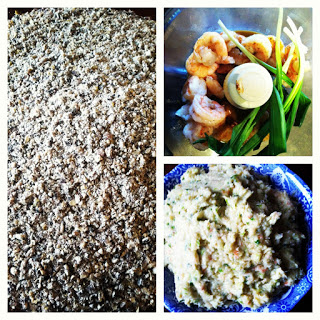
So, if you're into it, visit the Anson Mills website and peruse their many varieties of "artisan mill goods from organic heirloom grains."  Your mind might just get blown.  If you live in Denver you can find Anson Mills products at Marczyk Fine Foods (in the freezer section, which seems weird, I know, but remember that nutrient-dense germ I was talking about?  It contains oils that will go rancid over time if not kept cold).  The variety I chose for this recipe is the Native Coarse Blue Corn grits.  I'm quite sure you could get wonderful results using just about any good-quality grits in this recipe, but if you are motivated to get your hands on this particular variety I can guarantee you won't regret it.  The blue corn, which is sourced by Anson Mills from the Cherokee Nation and is grown in the mountains of the Carolinas, tasted unlike any other kind of grits I've tried.  They had a very earthy and almost chestnut-like flavor with a mildly sweet finish.  The grits look a lot like any ol' coarse grain before you add water and then, all at once, they become this beautiful lavendar-blue hue that only intensifies as you cook them.  Such a color is so uncommonly found in food that you can't help but be surprised when you see it! 

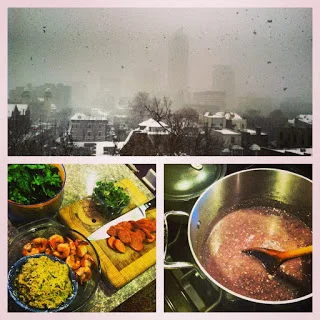
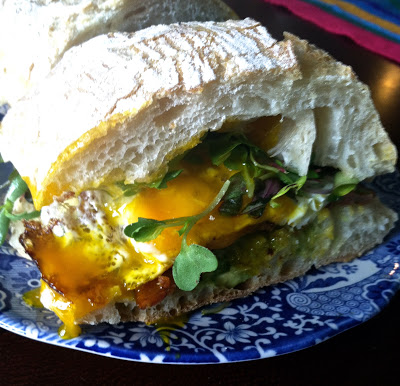
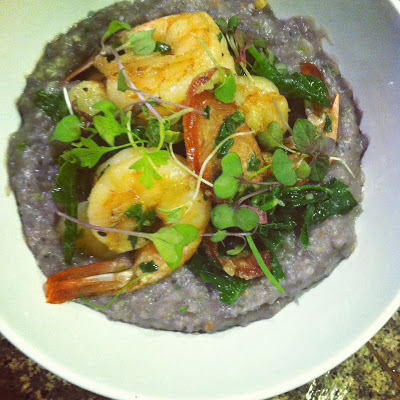
Not being from the South, I have no loyalties to any specific method of preparation for shrimp and grits.  When I encountered this innovative and somewhat atraditional recipe from the Food52 blog, originally appearing in the glorious cookbook The Gift of Southern Cooking by Edna Lewis and Scott Peacock, my curiosity was piqued.  I used their genius idea for making homemade, salty, buttery, boozy shrimp paste as the springboard for this incredibly flavorful and delicious dish.  Since it is springtime, I just had to incorporate some seasonal staples:  Ramps and spinach.  The ramps get blended into the shrimp paste to add a bright, pungent, garlicky flavor to the dish.  The spinach is gently wilted with sliced andouille sausage and served atop the grits.  I made some extra shrimp to place on top, but we had leftovers without the extra shrimp the next evening and I thought it was just as good and makes for a lighter meal.  Since microgreens have become newly available in the market, I've been buying a container each week and garnishing practically everything with them!  They're so beautiful and add a bright, herbaceous flavor to just about any dish.  Everything comes together in one incredibly colorful, comforting, warm bowl.  I can't think of anything that tastes more perfect on a blustery Spring evening! 

Rainbow Shrimp and Grits

serves 4

Shrimp and Ramp Paste:

1 pound shrimp, peeled and deveined

about 5 ramp stalks (one small bunch)

12 T salted butter (1 1/2 sticks), room temperature

1/3 cup good whiskey

juice of 1 small lemon (I used a Meyer)

good pinch of cayenne

plenty of salt and pepper

Grits:

1/2 pound Coarse Ground Grits

2 1/2 cups water

2 1/2 cups or so of shrimp stock (or more water)

about 3/4 cup shrimp paste

8-12 cooked shrimp (optional)

microgreens, for garnish (optional_

Wilted Spinach with Andouille:

1 pound baby spinach, washed and tough stems removed

2 T salted butter

2 T olive oil

2 cooked andouille sausages, sliced

2-3 T shrimp and ramp paste

First, prep your grits.  Place them in a bowl and cover with 2 1/2 cups of water.  After the grains settle to the bottom, skim off the chaff and hulls that float to the surface and discard.  If you have the time, allow the grits to soak overnight (this will dramatically reduce your cooking time but is not absolutely necessary if you don't mind tending to the grits for upwards of two hours).

Next, make the shrimp paste.  In a large pan, add half the butter and heat over medium-high.  Add shrimp (cook the optional extra 8-12 shrimp for the topping, at this point, and set aside) and season with salt and pepper.  Cook until the shrimp is just-done, about 5-6 minutes.  Remove shrimp with a slotted spoon and set aside.  Add whiskey, lemon juice, and cayenne to the pan and cook over medium-high, scraping the leftover bits of shrimp from the bottom of the pan with a wooden spoon, until the sauce is reduced to the consistency of syrup.  Season with salt and pepper.

Remove the shrimp tails, if they are still in tact, and add the shrimps with the reduced sauce to a food processor.  Pulse a few times to combine.  Add ramps and remaining salted butter and pulse until mixture resembles a coarse paste.  Season with salt and pepper, to taste.  Set aside the shrimp paste, keeping it at room temperature until ready to use.

Place shrimp stock (or water) in a small saucepan and keep simmering over low heat.  Add the grits, with the water in which they were soaking, to a medium saucepan over medium heat.  Stir constantly and simmer the grits until the liquid looks starchy and slightly thickened, about 8 minutes.  Cover the pan and reduce heat to low.  Stir every 10 minutes or so, making sure to loosen any grains that stick to the bottom of the pan with a wooden spoon.  Each time the grits become thick, add shrimp stock about 1/2 a cup or so at a time and continue cooking, adding at least 1 1/2 cups more liquid, until the grits are done.  Cooking time will be about 50-60 minutes if your grits were soaked overnight, and about 1 1/2 to 2 hours if they weren't.  You'll know when they're done when the grits are no longer starchy in the center.  The grains should be a little toothsome but fairly soft and not chalky in texture.

Once grits are cooked, remove from heat.  Stir in about 3/4 cup of the shrimp paste (or about half the batch) into the grits until combined and allow the flavors to sit together for about 10 minutes. 

While the grits are resting, cook the spinach.  In a large pan, add butter and oil and heat over medium-high.  When butter is bubbling, add your sliced andouille and cook until browned, about 4 to 5 minutes.  Add spinach (and extra 8-12 shrimp and a few tablespoons of shrimp paste and reduce heat to slightly above medium.  Stir spinach continuously until it is just-wilted and soft, about 4 minutes.  Remove from heat.

Ladle the grits into a bowl, making a little well in the center for the spinach.  Spoon the spinach and andouille into the grit wells and serve with extra shrimp on top (if using), garnished with microgreens. 

Comment

Comment

Bacon and Egg Breakfast Sandwich

I love breakfast.  Have I mentioned that before?  Not only is it increasingly evident that it truly is a "most important" meal, but it highlights two of my favorite foods - eggs and bacon!  Funny thing... this sandwich has both.

The composition is really simple, so the key is choosing the very best ingredients.  My sandwich started out with Marczyk's ciabatta, which is hand-made using local, organic flour and is incredibly delicious.  I also used Niman Ranch bacon, farm-fresh Penny's Eggs from Nunn, Colorado, and a peppery, flavorful, savory mix of microgreens.  What in the heck are these microgreens I am speaking of, you ask?  For those that don't know - they're the baby-est of the baby lettuces.  They start as the seeds of various herbs and vegetables (such as cilantro or beet) and are harvested when the leaf is about two inches tall.  They are often intense in flavor and are also highly nutritious, not to mention cute-as-a-button and a fun way to make just about any dish prettier.  If microgreens are difficult to find, arugula is a good substitute and is pretty widely available.


Bacon and Egg Breakfast Sandwich
makes one

1 small (8" or so) loaf Ciabatta, or other good-quality fresh bread
1/4 of a ripe avocado
3 strips bacon, fried crisp and fat reserved
1 egg
1/4 cup microgreens (or baby lettuce greens)
salt and pepper, to taste

Slice bread in half, lengthwise.  Mash the avocado with a fork and spread on one side of the bread.

In a small pan, add about 2 tsp of the reserved bacon fat and heat over medium-high.  When fat is hot, add egg and fry until the white's edges are crispy and golden, about 5 minutes.  Layer bacon, fried egg, and microgreens on your bread and sprinkle with salt and pepper.  Slice in half and enjoy.

Comment

2 Comments

Millet and Caramelized Onion Cakes with Mizuna Salad

Whole grains.  We know we're supposed to eat them but we're not exactly sure how.  You see a lot of cereals, breads, and other packaged, grain-based products that have fancy looking labels telling you how wonderful whole grains are, so that looks like a good option.  But the full story is that they are often produced with a raw material that, while it was once a whole grain, ends up getting pulverized and processed until much of it's nutrition is lost.

I like to think about it this way:  If you want to eat healthier, cook at home as much as you can.  If you want to cook healthier, stick to buying ingredients - not food - at the grocery store.  You're probably like, "I do buy ingredients!" and I'll be like "so, did anything you buy come in a package with an ingredients list?" and then you might understand what I mean.  I'm not saying all food from the grocery store is bad.  I still routinely buy pasta, jam, hot sauce and bread, among other things.  I just try to find the best ones I can, preferably made locally, and I know I've made a well-rounded trip to the grocery store when I look down in my basket and see mostly ingredients:  produce, whole grains, oils and vinegars, cheese... you get the idea.

So, with the intent of demonstrating that starting with ingredients and ending with wholesome food doesn't have to be a daunting task, I give you a simple, wholesome, from-scratch dish.  The flavors are simple but compelling - herbaceous, toasty, corn-like millet is toasted, cooked into mush, and mixed with sweet and pungent caramelized onions.  No flours, no fillers, just a little egg and seasoning and they come together just beautifully.  The homemade buttermilk ricotta makes this dish feel really special.  You don't need any fussy equipment, just a fine sieve, some cheesecloth (or cheesecloth-like material, if you happen to be a weirdo like me and have a few spare gauze bags laying around) and a nice, big pot.  The result is creamy, mild, slightly tangy and has almost infinite uses.  If you can't squeeze the extra time in to make ricotta, I would recommend using a good-quality fromage blanc or even ricotta salata, but for heaven's sake don't buy that Miceli's ricotta in a tub.  Every time you do, an elderly Italian man sheds a single tear...


Millet and Caramelized Onion Cakes
makes about 10 cakes

1 cup millet
2 cups water
2 T butter
2 T vegetable oil
1 yellow onion, thinly sliced
1 egg, lightly beaten
salt and pepper
bacon fat (optional)

Place a medium saucepan over medium-high heat and add millet.  Toast in the dry pan, stirring constantly, until it becomes fragrant, about 4 minutes.  Add water and bring to a boil.  Reduce heat to low, cover, and simmer until all of the liquid is absorbed, about 20 minutes, stirring every few minutes to release the starches and soften the millet to a mush.  Allow to cool for about 15 minutes.

Meanwhile, caramelize your onions.  Add butter and 1 T vegetable oil to a large pan and heat over medium-high.  Reduce heat slightly and add sliced onions and cook, stirring often, until the onions are soft and deep golden, about 12 minutes.  Add onions and the egg to the millet and mix well until the mixture holds together.  Season with salt and pepper and mix well.  Form mixture into 3-inch balls and flatten into cakes.

In a large frying pan, add remaining vegetable oil and a couple tablespoons of bacon fat and heat over medium-high until the bacon fat melts.  Reduce heat slightly and fry cakes until golden brown, about 4 minutes per side, adding more fat if necessary.  Finish with a little salt and serve atop Mizuna and Meyer Lemon Vinaigrette, then top with ricotta.

Mizuna with Meyer Lemon Vinaigrette
serves 4

about 1/4 lb mizuna
1 meyer lemon, juiced
2 T champagne vinegar
1 tsp honey
1/4 cup olive oil
salt, to taste
1/2 cup homemade buttermilk ricotta (recipe below)
2 T sliced green onions

Wash mizuna well and spin dry.  Add lemon juice, vinegar and honey to a blender and pulse until the honey is blended.  While the blender is running, pour in the olive oil in a slow, steady stream.  Add salt to taste.

Add a splash of the dressing to the buttermilk ricotta then mix in the green onions.  Serve salad with millet cakes topped with the ricotta.


Ian Knauer's Buttermilk Ricotta
makes about 2 cups

1 gallon whole milk
3 cups buttermilk
1/2 cup heavy cream
2 tsp kosher salt

Place all ingredients in a large pot over medium-high heat and slowly bring to a boil, stirring frequently to prevent scorching on the bottom of the pot.  Just before the liquid starts to bubble (the mixture will thicken and curdle) remove from heat.  Pour liquid through a cheesecloth-lined sieve and allow to drain for at least 15 minutes.  Store, covered, in the refrigerator for up to 1 week.

2 Comments

Comment

Quinoa, Apple and Almond Bars

Eating wholesome food might mean different things to different people, but I think everybody can agree that we could all do with less processed food in our diet.  The difficulty is that we so often find ourselves in situations where we need to eat on the run.  I almost always have a bag of dried apples and raw almonds in my purse so I can stave off hunger between meals, but sometimes you need a snack with a little more protein and substance... Enter, Quinoa Bars!

Now, you should all know that I haven't always ridden on board the quinoa train.  Maybe I had one too many sad, tasteless black bean and quinoa salads before I decided I didn't like it.  But since the humble grain, which isn't actually a grain at all, is not only wholesome but also happens to be something that grows really well in the Southern Rocky Mountains of Colorado, I decided to give it another go.

The important thing to know about cooking quinoa is:  rinse it!  The tiny seeds are coated with saponin, which not only gives it a bitter, soapy taste but makes the quinoa less digestible.  Even if you purchase the packaged, pre-rinsed stuff, I would recommend rinsing (because, well, it couldn't hurt!).  These bars are just-sweet, with a nice combination of crunch and chew, and they pretty much just taste like what's in 'em.  Go figure!  No over-processed flours or sugars necessary.  Each bar has about 180 calories, so enjoy them as a light snack between meals.


Quinoa, Apple and Almond Bars
makes 18

1 cup quinoa
2 cups water
1/2 cup butter (or coconut oil)
1/3 cup honey
1 cup plus 1/2 cup almonds
4 oz dried apples (about 2 cups)
1/3 cup honey
1 1/2 tsp. cinnamon
1 tsp almond extract
1 tsp vanilla extract
1 T salt
2 eggs, lightly beaten
1/4 cup Demerara sugar

Heat oven to 350 degrees.  In a small saucepan, cover quinoa with water and bring to a boil.  Reduce heat to low and cook, covered, until the liquid has absorbed, about 15 minutes.  Set quinoa aside.

Meanwhile, brown your butter (skip this step if using coconut oil) - Melt in a small saucepan over medium heat until the foamy bubbles start to subside and the fat solids begin to brown and smell toasty, about 7 minutes.  Set butter aside.

In a food processor, add apples and 1 cup of the almonds and pulse until well chopped.  Add honey, cinnamon, both extracts and salt and mix until combined.  Add 1 cup of the cooked quinoa and pulse again until mixture comes together (this helps to absorb all the honey so the mixture will come clean out of the food processor).  In a large bowl, combine the remaining quinoa with the quinoa mixture and the remaining almonds, roughly chopped or slivered.  Add butter and eggs and mix well.

Line a baking sheet with parchment paper and grease with a little cooking spray or butter.  Press quinoa mixture into the baking sheet and smooth the top with a spatula until even.  Sprinkle liberally with demerara sugar.  Bake until set, about 30 minutes.  Remove from oven and place on a wire rack.  Allow to cool completely before slicing into bars.

Comment

Comment

Buttermilk Scones, trial 1 (aka the Quest for the Perfect Buttermilk Scone)


I'm guessing most people resolve to bake less when the year is new, but not this gal!  I've decided that 2013 is the year I perfect my buttermilk scones.  Why, you ask?  Because scones are really delicious and I drink a lot of coffee and tea!  And because why not?

So this is trial 1.  This recipe was adapted from Beth Dunn's Proper British Scones.  While it is apparently more English to make your scones by rolling out the dough and cutting them like biscuits, I still prefer molding my dough into disks and cutting the scones into wedges.  Good scones can only come from dough that is handled properly and I find myself far less likely to over-handle the dough if I form it rather than roll it out.  I also have the compulsive need to sprinkle raw demerara sugar on my scones and that's probably not properly English, either.  But no matter!  The goal is not to make authentic English scones, but to make my best version of a buttermilk scone.  I will insist, however, that  you serve these with clotted cream, which can be found at Marczyk's for all you Denver-Dwellers, or even crème fraîche if you can't find the clotted stuff (I know that might sound weird to all you Americans out there that are used to buttering your scones... but trust me on this!).  Lemon curd is always a delicious choice when talking about scone accoutrements.  Also, serve these scones with the best-quality jam that you can get your hands on!  Preferably some made by a local artisan, like Dagstani & Sons, or perhaps just the adorable little old lady down the street.  


Buttermilk Scones, trial 1
makes 12 small scones

2 cups flour
2 1/2 tsp sugar
1 1/2 tsp baking powder
1/2 tsp kosher salt
1/4 lb. butter, diced and chilled
2/3 cup 2% buttermilk (cream top, if available)
1 egg
demerara sugar, for sprinkling


Heat oven to 425 degrees.

Sift dry ingredients together in a large bowl.  Add butter and work with your fingers until mixture resembles fine crumbs.  Add buttermilk and mix with a wooden spoon until the dough just comes together (just a few swift motions should do it - be sure not to over-work your dough).

Turn the dough onto a lightly-floured work surface.  Divide into two and gently knead the first batch until the dough becomes just-smooth.  Form into a disk.  Repeat with second batch and place disks on a silpat (or parchment paper) lined baking sheet.  Using a knife or dough scraper, cut disks into 6 wedges.

In a small bowl, whisk 1 egg with a splash of buttermilk.  Brush disks with your egg wash and sprinkle generously with the demerara sugar.  Place in the 425 degree oven and bake until just golden, about 15 minutes.

Comment