Viewing entries in
"Baked Goods"

Comment

Quinoa, Apple and Almond Bars

Eating wholesome food might mean different things to different people, but I think everybody can agree that we could all do with less processed food in our diet.  The difficulty is that we so often find ourselves in situations where we need to eat on the run.  I almost always have a bag of dried apples and raw almonds in my purse so I can stave off hunger between meals, but sometimes you need a snack with a little more protein and substance... Enter, Quinoa Bars!

Now, you should all know that I haven't always ridden on board the quinoa train.  Maybe I had one too many sad, tasteless black bean and quinoa salads before I decided I didn't like it.  But since the humble grain, which isn't actually a grain at all, is not only wholesome but also happens to be something that grows really well in the Southern Rocky Mountains of Colorado, I decided to give it another go.

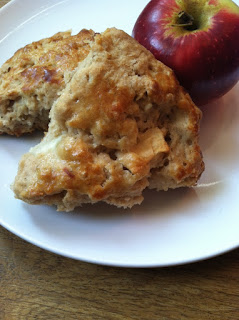
The important thing to know about cooking quinoa is:  rinse it!  The tiny seeds are coated with saponin, which not only gives it a bitter, soapy taste but makes the quinoa less digestible.  Even if you purchase the packaged, pre-rinsed stuff, I would recommend rinsing (because, well, it couldn't hurt!).  These bars are just-sweet, with a nice combination of crunch and chew, and they pretty much just taste like what's in 'em.  Go figure!  No over-processed flours or sugars necessary.  Each bar has about 180 calories, so enjoy them as a light snack between meals.


Quinoa, Apple and Almond Bars
makes 18

1 cup quinoa
2 cups water
1/2 cup butter (or coconut oil)
1/3 cup honey
1 cup plus 1/2 cup almonds
4 oz dried apples (about 2 cups)
1/3 cup honey
1 1/2 tsp. cinnamon
1 tsp almond extract
1 tsp vanilla extract
1 T salt
2 eggs, lightly beaten
1/4 cup Demerara sugar

Heat oven to 350 degrees.  In a small saucepan, cover quinoa with water and bring to a boil.  Reduce heat to low and cook, covered, until the liquid has absorbed, about 15 minutes.  Set quinoa aside.

Meanwhile, brown your butter (skip this step if using coconut oil) - Melt in a small saucepan over medium heat until the foamy bubbles start to subside and the fat solids begin to brown and smell toasty, about 7 minutes.  Set butter aside.

In a food processor, add apples and 1 cup of the almonds and pulse until well chopped.  Add honey, cinnamon, both extracts and salt and mix until combined.  Add 1 cup of the cooked quinoa and pulse again until mixture comes together (this helps to absorb all the honey so the mixture will come clean out of the food processor).  In a large bowl, combine the remaining quinoa with the quinoa mixture and the remaining almonds, roughly chopped or slivered.  Add butter and eggs and mix well.

Line a baking sheet with parchment paper and grease with a little cooking spray or butter.  Press quinoa mixture into the baking sheet and smooth the top with a spatula until even.  Sprinkle liberally with demerara sugar.  Bake until set, about 30 minutes.  Remove from oven and place on a wire rack.  Allow to cool completely before slicing into bars.

Comment

Comment

Buttermilk Scones, trial 1 (aka the Quest for the Perfect Buttermilk Scone)


I'm guessing most people resolve to bake less when the year is new, but not this gal!  I've decided that 2013 is the year I perfect my buttermilk scones.  Why, you ask?  Because scones are really delicious and I drink a lot of coffee and tea!  And because why not?

So this is trial 1.  This recipe was adapted from Beth Dunn's Proper British Scones.  While it is apparently more English to make your scones by rolling out the dough and cutting them like biscuits, I still prefer molding my dough into disks and cutting the scones into wedges.  Good scones can only come from dough that is handled properly and I find myself far less likely to over-handle the dough if I form it rather than roll it out.  I also have the compulsive need to sprinkle raw demerara sugar on my scones and that's probably not properly English, either.  But no matter!  The goal is not to make authentic English scones, but to make my best version of a buttermilk scone.  I will insist, however, that  you serve these with clotted cream, which can be found at Marczyk's for all you Denver-Dwellers, or even crème fraîche if you can't find the clotted stuff (I know that might sound weird to all you Americans out there that are used to buttering your scones... but trust me on this!).  Lemon curd is always a delicious choice when talking about scone accoutrements.  Also, serve these scones with the best-quality jam that you can get your hands on!  Preferably some made by a local artisan, like Dagstani & Sons, or perhaps just the adorable little old lady down the street.  


Buttermilk Scones, trial 1
makes 12 small scones

2 cups flour
2 1/2 tsp sugar
1 1/2 tsp baking powder
1/2 tsp kosher salt
1/4 lb. butter, diced and chilled
2/3 cup 2% buttermilk (cream top, if available)
1 egg
demerara sugar, for sprinkling


Heat oven to 425 degrees.

Sift dry ingredients together in a large bowl.  Add butter and work with your fingers until mixture resembles fine crumbs.  Add buttermilk and mix with a wooden spoon until the dough just comes together (just a few swift motions should do it - be sure not to over-work your dough).

Turn the dough onto a lightly-floured work surface.  Divide into two and gently knead the first batch until the dough becomes just-smooth.  Form into a disk.  Repeat with second batch and place disks on a silpat (or parchment paper) lined baking sheet.  Using a knife or dough scraper, cut disks into 6 wedges.

In a small bowl, whisk 1 egg with a splash of buttermilk.  Brush disks with your egg wash and sprinkle generously with the demerara sugar.  Place in the 425 degree oven and bake until just golden, about 15 minutes.

Comment

1 Comment

Aged Cheddar Scones

A good scone can be hard to come by, these days.  I am rarely satisfied by the over-sweet, cakey varieties that are available in supermarkets and don't even get me started on the frosted abominations they sell at most coffee shops.  To me, a good scone should be light, crumbly, and not the least bit cakey in texture.  It should be moist enough to have a tender bite but dry enough to crumble.  No frosting allowed!

These scones are of the savory variety and make a wonderful accompaniment to soups and stews.  I also tried mine with a little Sicilian Lemon Marmalade (available at Marczyk's and WELL worth the high price tag!) for a hint of tangy sweetness and it was just delicious.  The cheese I used was Nakhu Cheddar from Windsor Dairy, where they produce old world cheeses from raw, grass fed milk.  Any dry, sharp aged cheddar will do here but if you live in Colorado, give the Windsor Dairy cheese a try!

I assembled these scones like drop biscuits, gently forming the dough into balls and pressing it into little disks.  This enables you to form scones without handling the dough very much, which results in a wonderful, crumbly texture.  Make sure to monitor your moisture levels with this dough - I used a very thick sour cream, so if using a runnier cream you may not need the extra water.  As long as there's just enough liquid to help the dough barely hold together, the end result will turn out just right!


Cheese Scones
makes about a dozen

1 1/2 cups grated sharp aged cheddar
2 cups flour
1 T baking powder
6 T butter, diced and chilled well
6 T sour cream
3 T water
1 tsp salt
3 eggs

Heat your oven to 375 degrees.  In a large bowl, whisk flour and baking powder together.  Add butter and cut with a pastry blender (or blend with your fingers, working quickly) until the mixture resembles coarse crumbs.  Add cheese, sour cream and 2 of the eggs, lightly beaten, and mix until just combined.  If dough doesn't come together, add extra water one tablespoon at a time.

Make an egg wash by whisking the remaining egg with 2 tablespoons of water or milk.  Turn the dough out onto a lightly floured surface.  Divide in half and set one half aside.  Press the dough into a disk about 2 inches thick and repeat with the remaining dough.  Place the disks on a large baking sheet.  Score each disk into six wedges and brush with egg wash. Bake until just golden, about 20 minutes.  Serve immediately and store at room temperature for up to three days.

For drop-biscuit style scones, simply form dough into 12 small balls and gently pat down to form a disk.  Brush with egg wash and bake according to above instructions.


1 Comment

Comment

Martha's Apple Scones, Colorado-Style

I love Fall.  Have I mentioned that before?  (I know I've mentioned it before).  I love the cool, crisp weather, the vibrant, colorful leaves on all the Aspens, and most of all... the produce!  So, in celebration of the beginning of my favorite season, here's a recipe that features one of my favorite fall fruits - apples.

While apples are really wonderful in their natural state, when you have a lot of them it's nice to incorporate them into recipes!  I had so many apples on hand from my Grant Family Farms CSA fruit share that I decided to track down this wonderful recipe from Martha Stewart.  These scones are moist but still crumbly and just sweet enough to feel like a treat.  The oats lend a little chewy texture and add a heartiness to the scones.  I tripled this recipe, brought 2 batches to Marczyk's to share with my co-workers, and the third batch I threw in a plastic bag and stuck in the freezer.  Pretty good way to get through almost a dozen apples, am I right?

Martha's Apple Scones, Colorado-Style
makes 12 scones

1 2/3 cups all-purpose flour, plus more for rolling
1 1/3 cups old-fashioned rolled oats
1/4 cup light-brown sugar
1 teaspoon ground cinnamon
1/2 teaspoon freshly grated nutmeg
2 teaspoons baking powder
1/2 teaspoon salt
1 1/2 sticks very cold unsalted butter, cut into small cubes
1 1/2 cups diced apple (3 small apples, peeled)
2/3 cup cold buttermilk, plus more for brushing
Raw turbinado sugar (optional)

Heat oven to 400 degrees.  In a large bowl, whisk together the dry ingredients.  Using your fingers or a pastry cutter, break the butter apart until a crumbly texture results and no butter pieces are larger than the size of a pea.  Add apples and buttermilk and mix with a wooden spoon until the dough just comes together.

Lightly dust a clean work surface with flour.  Divide the dough into two equal portions and sprinkle with flour so that the dough won't stick.  Flatten each portion into circles about 1 1/2 inches thick (about the diameter of a salad plate).  Place on a baking sheet lined with parchment paper and, using a knife or a dough scraper, score each circle of dough into six equal wedges.  Brush the tops of the scones with a little buttermilk and generously sprinkle with turbinado sugar.  Bake until just golden, about 25 minutes.  Allow to cool on a wire rack for at least 10 minutes.  Serve warm or room temperature with jam and clotted cream.

Comment

Comment

Zucchini and Pine Nut Olive Oil Cake

Most of us are familiar with zucchini bread, but when it comes to using zucchini in sweet stuff, many people stop there.  Here is something a bit more elegant than zucchini bread but it is so quick and easy to put together that you don't even need to bust out your fancy Kitchenaid standing mixer.  A bowl and a wooden spoon are all you need to make this moist and delicious summer cake that is just as good for a slightly decadent breakfast as it is for a light, Summery and flavorful dessert.


Zucchini and Pine Nut Olive Oil Cake
serves 6

1/2 cup mild olive oil
1 cup sugar
1 egg
1 tsp. vanilla
zest of 1 lemon (about 1 T)
1 medium zucchini, grated (1 cup packed)
1 cup all-purpose flour
1/4 cup cake flour
1/2 tsp. baking powder
1/2 tsp. salt
1/2 cup pine nuts

Heat the oven to 350 and grease an 8" skillet or cake pan with a little extra olive oil.  In a medium bowl, mix oil, sugar, egg, vanilla and lemon zest until smooth.  Add zucchini and mix well.  Sift dry ingredients and add to cake batter.  Mix well to combine.  Stir in the pine nuts and pour batter into skillet or pan.  Bake until cake is set, about 40-45  minutes.  Allow to cool in the pan on a wire rack for at least 10 minutes before slicing.  Serve warm or at room temperature. 

Comment