Viewing entries in
"Sides"

Comment

Honey Jalapeño Dill Dressing with Apple & Kohlrabi Slaw


You hear a lot of talk about sustainability in food, these days.  It means a lot of different things to a lot of different people, but not everybody realizes how simple it can be to take steps towards eating sustainably in your own home.

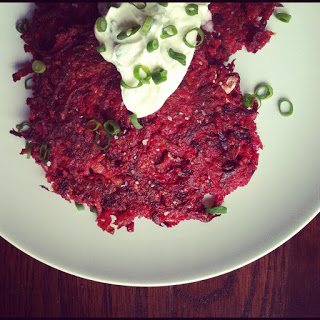
One of the things I like to focus on, because it's something absolutely everybody can add to their cooking routine, is managing waste.  What are we throwing away that we could actually be saving and using?

My friends at The Real Dill, the best pickle makers in the known universe operating right here in the city of Denver, take this concept to new, flavor-packed heights by suggesting that we use what many people probably throw away as an ingredient.  What a concept!  I don't know about everybody else, but I have dumped many a precious jarful of pickle brine down the sink without a second thought.  But why in heavens shouldn't we use the stuff?!  It's absolutely full of delicious flavor!

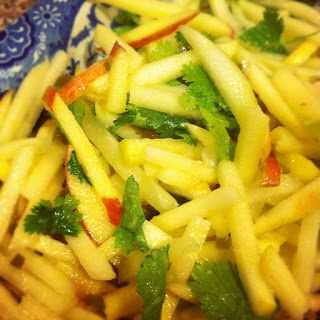
For this recipe, I used not only the brine but the pickled garlic cloves and jalapeño that can be found in every jar of their Jalapeño Honey Dills.  The result is a refreshingly light, sweet and tangy dressing with the essence of spicy-sweet pickles.  The season is still bountiful with apples and kohlrabi, so I tossed them in the dressing with the diced, pickled jalapeno and a healthy handful of cilantro leaves.  Serve right away for a crispy, crunchy and subtle-tasting slaw or let it marinate for a day or two (leave the cilantro leaves out and add just before serving) for a sweet, tangy and pickled-tasting version.  Still have a couple of pickles left?  Dice them up and invite them to the slaw party!  The more the merrier...


Honey Jalapeño Dill Dressing with Apple & Kohlrabi Slaw
serves 4-6

Dressing:
1/4 cup Pickle Brine
2 pickled garlic cloves
2 tsp mustard
2 tsp honey
2 T olive oil
salt and pepper, to taste

Slaw:
1 small Kohlrabi, peeled
2 apples
1-2 pickled jalapeños, seeded and diced
1 cup cilantro leaves

First, assemble the dressing.  In a blender, combine brine, garlic, mustard and honey and blend until garlic is well-chopped.  With the blender on, slowly drizzle in the olive oil.  Set aside.

Using a mandoline with the julienne attachment, cut the unpeeled apples and kohlrabi into 1/4" strips.  Toss together with dressing and diced jalapeño.  If desired, allow to marinate for 1 to 2 days for a more intense-flavored slaw.  Toss with cilantro leaves just before serving.

Comment

1 Comment

Beet, Carrot & Potato Cakes

I am a beet lover.  It's a good thing, too, because we got more beets than I knew what to do with in the last several weeks of our Grant Family Farms CSA share.  Thankfully, they are one of those hearty vegetables that seems to last forever when stored properly, so I'm still working through my rather sizable supply of them.

My dear husband, unfortunately, does not like beets (one of the very few things he just never had a taste for).  That means I'm always trying to come up with clever ways to hide them, although their vibrant pink color inevitably gives them away!  But their flavor doesn't have to be quite so earthy and strong, if you know how to treat them properly.  My favorite way to sneak beets into a meal is by mixing them with some other vegetables and frying the heck out of them.  Even the pickiest eaters won't scoff at a crispy, salty, fried vegetable cake.  Serve them up with some nice, thick sour cream and sliced green onions and you've got a beautiful, nutritious and super tasty side dish.  Boom!

Beet, Carrot & Potato Cakes
makes about 12

1 large beet, scrubbed & grated
2 small yukon gold potatoes, scrubbed & grated
2 small carrots, peeled & grated
1 small white onion, grated
2 eggs, lightly beaten
3/4 cup matzoh meal
vegetable oil
salt, to taste

In a large bowl, mix together the grated vegetables, eggs and matzoh meal.  Add about 1/4 cup of vegetable oil to a large frying pan and heat over medium-high.  Form the mixture into small patties and add to the hot oil, gently pressing the cakes flat with a spatula.  Fry until crispy and browned, about 4-5 minutes per side, adding extra oil as necessary.  Allow to drain on a paper-towel lined baking sheet and salt immediately after removing from the pan.  Serve immediately with sour cream and sliced green onions, if desired.

1 Comment

1 Comment

Aged Cheddar Scones

A good scone can be hard to come by, these days.  I am rarely satisfied by the over-sweet, cakey varieties that are available in supermarkets and don't even get me started on the frosted abominations they sell at most coffee shops.  To me, a good scone should be light, crumbly, and not the least bit cakey in texture.  It should be moist enough to have a tender bite but dry enough to crumble.  No frosting allowed!

These scones are of the savory variety and make a wonderful accompaniment to soups and stews.  I also tried mine with a little Sicilian Lemon Marmalade (available at Marczyk's and WELL worth the high price tag!) for a hint of tangy sweetness and it was just delicious.  The cheese I used was Nakhu Cheddar from Windsor Dairy, where they produce old world cheeses from raw, grass fed milk.  Any dry, sharp aged cheddar will do here but if you live in Colorado, give the Windsor Dairy cheese a try!

I assembled these scones like drop biscuits, gently forming the dough into balls and pressing it into little disks.  This enables you to form scones without handling the dough very much, which results in a wonderful, crumbly texture.  Make sure to monitor your moisture levels with this dough - I used a very thick sour cream, so if using a runnier cream you may not need the extra water.  As long as there's just enough liquid to help the dough barely hold together, the end result will turn out just right!


Cheese Scones
makes about a dozen

1 1/2 cups grated sharp aged cheddar
2 cups flour
1 T baking powder
6 T butter, diced and chilled well
6 T sour cream
3 T water
1 tsp salt
3 eggs

Heat your oven to 375 degrees.  In a large bowl, whisk flour and baking powder together.  Add butter and cut with a pastry blender (or blend with your fingers, working quickly) until the mixture resembles coarse crumbs.  Add cheese, sour cream and 2 of the eggs, lightly beaten, and mix until just combined.  If dough doesn't come together, add extra water one tablespoon at a time.

Make an egg wash by whisking the remaining egg with 2 tablespoons of water or milk.  Turn the dough out onto a lightly floured surface.  Divide in half and set one half aside.  Press the dough into a disk about 2 inches thick and repeat with the remaining dough.  Place the disks on a large baking sheet.  Score each disk into six wedges and brush with egg wash. Bake until just golden, about 20 minutes.  Serve immediately and store at room temperature for up to three days.

For drop-biscuit style scones, simply form dough into 12 small balls and gently pat down to form a disk.  Brush with egg wash and bake according to above instructions.


1 Comment

Comment

Colorado Melon Caprese

It just wouldn't be Summer without a little caprese in my life, but who says you have to make it with tomatoes?  The Italians?  Well, probably...  but I think this version, using some of those sweet, late-summer Colorado melons that are widely available this time of year, is a delicious and beautiful alternative!

This version, pictured, was made as little hors d'oeuvres on lovely metal cocktail skewers (*see note below for skewer directions).  You can also just combine all the ingredients in a big bowl and serve it family style, just don't use all of your oil and balsamic.  I used a marvelous Etnia Spanish olive oil with merquen (a Spanish smoked chile and cumin spice mix) to make this dish more interesting and flavorful, but a basil-infused olive oil, garlic oil, or even just regular olive oil with work fine.


Colorado Melon Caprese

1 medium (or 2 small) heirloom melon, washed
1/2 a lemon, juiced
1 bunch green basil
1 bunch purple basil
1 8-oz. container fresh mozzarella ciliegine (the small, bite-sized balls)
about 1/4 cup olive oil with merquen (or your favorite infused olive oil)
about 1/4 cup white balsamic vinegar
salt and pepper, to taste

Cut the melon in half and scoop out the seeds with a spoon.  Using a melon baller, scoop out little bite-sized balls of melon until no more flesh remains.  Place melon balls in a bowl and gently toss with lemon juice.  Tear the larger basil leaves into small, 1" pieces and leave smaller leaves whole.  Add mozzarella and basil and toss ingredients to mix.  Drizzle with oil and balsamic vinegar and season with salt and pepper, to taste.  Gently toss and serve immediately.

*To assemble skewers:  make individual caprese bites using reusable metal cocktail skewers.  First, spear a melon ball, followed by a purple basil leaf and then a green basil leaf.  Follow with a piece of mozarella, then drizzle each skewer with oil and balsamic and lightly season with salt and pepper, to taste. 

Comment

Comment

Crispy Fingerling Chips

Who doesn't love fingerling potatoes?  They're starchy and filling like a regular potato, but in a cute, rustic-looking little package!  I love them and I don't care who knows it.

While fingerlings are often kept whole and simply roasted, sometimes I like to turn them into homey, crispy, little chips.  These are wonderful served alongside scrambled eggs, as a side dish with any kind of sandwich, or just eaten as a snack by themselves.  The funniest-looking, knobby little potatoes can make for some interesting shapes, so don't just pick the perfect ones!


Crispy Fingerling Chips
makes about 2 cups

1/2 lb. fingerling potatoes, washed and scrubbed
1/4 cup olive oil
salt and pepper, to taste

Heat oven to 400 degrees.  Using a mandoline, slice the potatoes lengthwise so they are thin but still sturdy, about 1/16th of an inch.  In a medium bowl, toss potato slices with olive oil until they are well-coated and arrange in a single layer on 2 large baking sheets. 

Bake chips until the potatoes shrink and start to crisp on the bottom, about 20 minutes.  Remove from oven and flip each slice, then return to the oven and bake until potatoes are golden-brown and crispy all over (smaller slices will take less time than larger ones), about 20 more minutes.  Remove from oven, sprinkle with salt and pepper, to taste, and allow to cool for at least 5 minutes before serving.

Comment